Quick Start
Set up the Duo SDK and run your first MPC operations. Pick your framework and follow the steps. Each quickstart runs against the hosted demo server, so you can generate a key and sign without deploying anything first.
Set up the Mobile SDK and run your first MPC operations. You will create a working MPC two-party setup, where the first party, a React Native mobile application interacts with Duo Server as a second party. We are providing a demo server endpoint for your convenience.
Use the hosted demo server for testing. No deployment is required.
- Cloud Node Endpoint:
demo-server.silencelaboratories.com - Cloud Verifying Key:
01cfa1ff5424d14eb60614d7ddf65a32243d26ddf7000d10007853d7336395efe4
As a shared server, it provides no rate-limit or uptime guarantees, and keyshares stored on it may be purged without notice. Do not use it for production.
Prerequisites
- Node.js (LTS) and a package manager (npm or Yarn).
- An NPM token from Silence Laboratories to install the SDK from our private registry. Don't have one? Email [email protected].
- A running iOS Simulator (Xcode) or Android emulator (Android Studio) to launch the app on.
Setup the Mobile SDK (React Native)
Create a new React Native project
npx create-expo-app@latest SilentMPC --template blank-typescript
Configure Your Package Manager
Configure your package manager with a private token provided by us to access the private registry.
Use a consistent install workflow throughout (either npm install or yarn add). Note that .npmrc configuration applies to both npm and Yarn v1, while Yarn v2+ uses .yarnrc.yml.
- yarn v2
- yarn v1 / npm
- Create a
.yarnrc.ymlfile in the root of your project and add the following line:
npmScopes:
  "silencelaboratories":
    npmAlwaysAuth: true
    npmRegistryServer: "https://registry.npmjs.org"
    npmAuthToken: ${NPM_TOKEN}
- Create a
.npmrcfile in the root of your project and add the following line:
//registry.npmjs.org/:_authToken=${NPM_TOKEN}
- Add the npm token as an environment variable, e.g., in a terminal session run:
export NPM_TOKEN=your-npm-token
Install the core library
- npm
- yarn
npm install @silencelaboratories/silent-shard-sdk
yarn add @silencelaboratories/silent-shard-sdk
Install the native SDK(s) for your wallet types
You only need the native SDKs for the wallet families your app actually supports — installing extras only adds bundle size.
| Wallet family | Algorithm | Native package |
|---|---|---|
| EVM, Bitcoin, etc. | ECDSA | @silencelaboratories/dkls-sdk |
| Solana, etc. | EdDSA | @silencelaboratories/schnorr-sdk |
| Post-quantum wallets | MLDSA | @silencelaboratories/mldsa-sdk |
- ECDSA
- EdDSA
- MLDSA
- npm
- yarn
npm install @silencelaboratories/dkls-sdk
yarn add @silencelaboratories/dkls-sdk
- npm
- yarn
npm install @silencelaboratories/schnorr-sdk
yarn add @silencelaboratories/schnorr-sdk
@silencelaboratories/mldsa-sdk uses JSI and C++ Nitro Modules instead of the "old" Bridge.
- npm
- yarn
npm install @silencelaboratories/mldsa-sdk react-native-nitro-modules
yarn add @silencelaboratories/mldsa-sdk react-native-nitro-modules
Project setup
Run the following command to generate the native code for your project:
npx expo prebuild
Session Creation
The Session object is the main entry point to interact with the Silent Shard SDK. It manages the lifecycle of the MPC operations.
import { CloudWebSocketClient } from "@silencelaboratories/silent-shard-sdk";
import { createEcdsaDuoSession } from "@silencelaboratories/silent-shard-sdk/ecdsa";

// Create a session
const cloudClient = new CloudWebSocketClient(
  "demo-server.silencelaboratories.com",
  true // Use true for secure connection, otherwise use false for local server
);

const session = await createEcdsaDuoSession({
  cloudVerifyingKey: "01cfa1ff5424d14eb60614d7ddf65a32243d26ddf7000d10007853d7336395efe4",
  client: cloudClient,
});
Run the MPC operations
After creating the session, you can perform MPC operations.
Key Generation
Generate MPC keyshares and return the client keyshare with keygen method.
const clientKeyshare = await session.keygen();
console.log("Client Public Key:", clientKeyshare.publicKeyHex);
Signature Generation
Sign a message using the sign method.
const signature = await session.sign({
  keyshare: clientKeyshare,
  // Keccak256 Hash("Trusted Third Parties are Security Holes")
  messageHash:
    "53c48e76b32d4fb862249a81f0fc95da2d3b16bf53771cc03fd512ef5d4e6ed9",
  derivationPath: "m",
});
console.log("Generated signature: ", signature);
Complete Code Example
Add the following code to your App.tsx.
import * as React from 'react';
import { CloudWebSocketClient } from '@silencelaboratories/silent-shard-sdk';
import { createEcdsaDuoSession } from '@silencelaboratories/silent-shard-sdk/ecdsa';

export default function App() {
  React.useEffect(() => {
    // We will MPC functions here
    const mpcTest = async () => {
      try {
        // Create a session.
        // 1st arg: the Cloud Node Endpoint (Duo Server host). Here we use the demo server.
        // 2nd arg: secure flag — true => wss:// (TLS), false => ws:// (e.g. a local server).
        const cloudClient = new CloudWebSocketClient('demo-server.silencelaboratories.com', true);
        const session = await createEcdsaDuoSession({
          // The server's public signing key, used to verify messages from the server party.
          cloudVerifyingKey: '01cfa1ff5424d14eb60614d7ddf65a32243d26ddf7000d10007853d7336395efe4',
          client: cloudClient,
        });

        // Key generation
        const clientKeyshare = await session.keygen();

        // Get public key of newly generated wallet
        console.log('Client Public Key:', clientKeyshare.publicKeyHex);

        // Signature generation
        const signature = await session.sign({
          keyshare: clientKeyshare,
          // Keccak256 Hash("Trusted Third Parties are Security Holes")
          messageHash: '53c48e76b32d4fb862249a81f0fc95da2d3b16bf53771cc03fd512ef5d4e6ed9',
          derivationPath: 'm',
        });

        console.log('Generated signature: ', signature);
      } catch (err) {
        console.error('MPC test failed:', err);
      }
    };
    mpcTest();
  }, []);

  return null;
}
Run your application!
Run your application in a classic way.
Expo Go support is coming soon too!
- npm
- yarn
npm run android
or
npm run ios
yarn android
or
yarn ios
Once the application is running, check your console log to see the key generation and signing process updates in real-time.
Happy signing!
The steps above run against our hosted demo server (endpoint and verifying key in Prerequisites), so you can generate a key and sign without deploying anything. To run your own Duo Server in production, see Duo Server.
Set up the Mobile SDK and run your first MPC operations.
You will create a working MPC two-party setup, where the first party, a Flutter mobile application interacts with Duo Server as a second party. We are providing a demo server endpoint for your convenience.
Use the hosted demo server for testing. No deployment is required.
- Cloud Node Endpoint:
demo-server.silencelaboratories.com - Cloud Verifying Key:
01cfa1ff5424d14eb60614d7ddf65a32243d26ddf7000d10007853d7336395efe4
As a shared server, it provides no rate-limit or uptime guarantees, and keyshares stored on it may be purged without notice. Do not use it for production.
Prerequisites
- The Flutter SDK (with Dart) and a working Flutter toolchain, follow the Flutter installation guide.
- A Dart pub token from Silence Laboratories for our private registry (
dart-pkg.silencelaboratories.com). Don't have one? Email [email protected]. - A running iOS Simulator (Xcode) or Android emulator (Android Studio) to launch the app on.
Setup the Mobile SDK (Flutter)
Create a new Flutter project
flutter create silent_mpc
Configure your dart pub client
The SDK is published to a private registry (dart-pkg.silencelaboratories.com). Authenticate dart pub with the token provided by Silence Laboratories:
dart pub token add https://dart-pkg.silencelaboratories.com
# Paste your token when prompted:
Enter secret token: <silence-dart-token>
Dependency Installation
- Add
silent_shard_sdkfrom thehttps://dart-pkg.silencelaboratories.comregistry. In terminal from root of the flutter project, run
dart pub add 'silent_shard_sdk:{"hosted":"https://dart-pkg.silencelaboratories.com"}'
Session Creation
The Session object is the main entry point to interact with the Silent Shard SDK. It manages the lifecycle of the MPC operations.
- ECDSA
- EdDSA
import 'package:silent_shard_sdk/silent_shard_sdk.dart' as sdk;

final cloudClient = sdk.CloudClient(baseUri: 'demo-server.silencelaboratories.com', isSecure: true);

final session = await sdk.createDuoEcdsaSession(
  cloudClient: cloudClient,
  cloudVerifyingKeyHex: '01cfa1ff5424d14eb60614d7ddf65a32243d26ddf7000d10007853d7336395efe4',
  storageClient: sdk.SimpleStorageClient(),
);
import 'package:silent_shard_sdk/silent_shard_sdk.dart' as sdk;

final cloudClient = sdk.CloudClient(baseUri: 'demo-server.silencelaboratories.com', isSecure: true);

final session = await sdk.createDuoEddsaSession(
  cloudClient: cloudClient,
  cloudVerifyingKeyHex: '01cfa1ff5424d14eb60614d7ddf65a32243d26ddf7000d10007853d7336395efe4',
  storageClient: sdk.SimpleStorageClient(),
);
Run the MPC operations
After creating the session, you can perform MPC operations.
Key Generation
Generate MPC keyshares and return the client keyshare with keygen method.
- ECDSA
- EdDSA
final keyshare = await session.keygen();
print('Client Public Key: ${keyshare.publicKeyHex}');
final keyshare = await session.keygen();
print('Client Public Key: ${keyshare.publicKeyHex}');
Signature Generation
Sign a message using the sign method.
- ECDSA
- EdDSA
final signature = await session.sign(
  keyId: keyshare.keyId,
  // Keccak256 Hash("Trusted Third Parties are Security Holes")
  messageHash: "53c48e76b32d4fb862249a81f0fc95da2d3b16bf53771cc03fd512ef5d4e6ed9",
  derivationPath: 'm',
);
print('Generated signature: ${hex.encode(signature)}');
final signature = await session.sign(
  keyId: keyshare.keyId,
  // Keccak256 Hash("Trusted Third Parties are Security Holes")
  messageHash: "53c48e76b32d4fb862249a81f0fc95da2d3b16bf53771cc03fd512ef5d4e6ed9",
  derivationPath: 'm',
);
print('Generated signature: ${hex.encode(signature)}');
Complete Code Example
Putting the steps above together into a runnable app:
- ECDSA
- EdDSA
import 'package:convert/convert.dart';
import 'package:flutter/material.dart';
import 'package:silent_shard_sdk/silent_shard_sdk.dart' as sdk;
void main() {
runApp(const MyApp());
}
class MyApp extends StatelessWidget {
const MyApp({super.key});
Future<void> _testMpcOperations() async {
final cloudClient = sdk.CloudClient(baseUri: 'demo-server.silencelaboratories.com', isSecure: true);
final session = await sdk.createDuoEcdsaSession(
cloudClient: cloudClient,
cloudVerifyingKeyHex: '01cfa1ff5424d14eb60614d7ddf65a32243d26ddf7000d10007853d7336395efe4',
storageClient: sdk.SimpleStorageClient(),
);
final keyshare = await session.keygen();
print('Client Public Key: ${keyshare.publicKeyHex}');
final signature = await session.sign(
keyId: keyshare.keyId,
// Keccak256 Hash("Trusted Third Parties are Security Holes")
messageHash: "53c48e76b32d4fb862249a81f0fc95da2d3b16bf53771cc03fd512ef5d4e6ed9",
derivationPath: 'm',
);
print('Generated signature: ${hex.encode(signature)}');
}
// This widget is the root of your application.
Widget build(BuildContext context) {
return MaterialApp(
home: Scaffold(
appBar: AppBar(title: Text('Silent ECDSA MPC Demo')),
body: Center(
child: ElevatedButton(
onPressed: () async {
await _testMpcOperations();
},
child: Text('Test ECDSA MPC operations'),
),
),
),
);
}
}
import 'package:convert/convert.dart';
import 'package:flutter/material.dart';
import 'package:silent_shard_sdk/silent_shard_sdk.dart' as sdk;
void main() {
runApp(const MyApp());
}
class MyApp extends StatelessWidget {
const MyApp({super.key});
Future<void> _testMpcOperations() async {
final cloudClient = sdk.CloudClient(baseUri: 'demo-server.silencelaboratories.com', isSecure: true);
final session = await sdk.createDuoEddsaSession(
cloudClient: cloudClient,
cloudVerifyingKeyHex: '01cfa1ff5424d14eb60614d7ddf65a32243d26ddf7000d10007853d7336395efe4',
storageClient: sdk.SimpleStorageClient(),
);
final keyshare = await session.keygen();
print('Client Public Key: ${keyshare.publicKeyHex}');
final signature = await session.sign(
keyId: keyshare.keyId,
// Keccak256 Hash("Trusted Third Parties are Security Holes")
messageHash: "53c48e76b32d4fb862249a81f0fc95da2d3b16bf53771cc03fd512ef5d4e6ed9",
derivationPath: 'm',
);
print('Generated signature: ${hex.encode(signature)}');
}
// This widget is the root of your application.
Widget build(BuildContext context) {
return MaterialApp(
home: Scaffold(
appBar: AppBar(title: Text('Silent EdDSA MPC Demo')),
body: Center(
child: ElevatedButton(
onPressed: () async {
await _testMpcOperations();
},
child: Text('Test EdDSA MPC operations'),
),
),
),
);
}
}
Run the flutter project
flutter run
Once the app launches, check your console log to see the key generation and signing process updates in real-time.
The steps above run against our hosted demo server (endpoint and verifying key in Prerequisites), so you can generate a key and sign without deploying anything. To run your own Duo Server in production, see Duo Server.
Set up the Mobile SDK and run your first MPC operations.
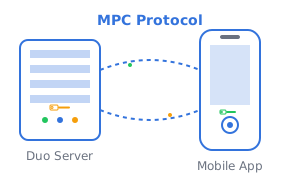
You will create a working MPC two-party setup, where the first party, an Android application interacts with Duo Server as a second party. We are providing a demo server endpoint for your convenience.
What you'll build
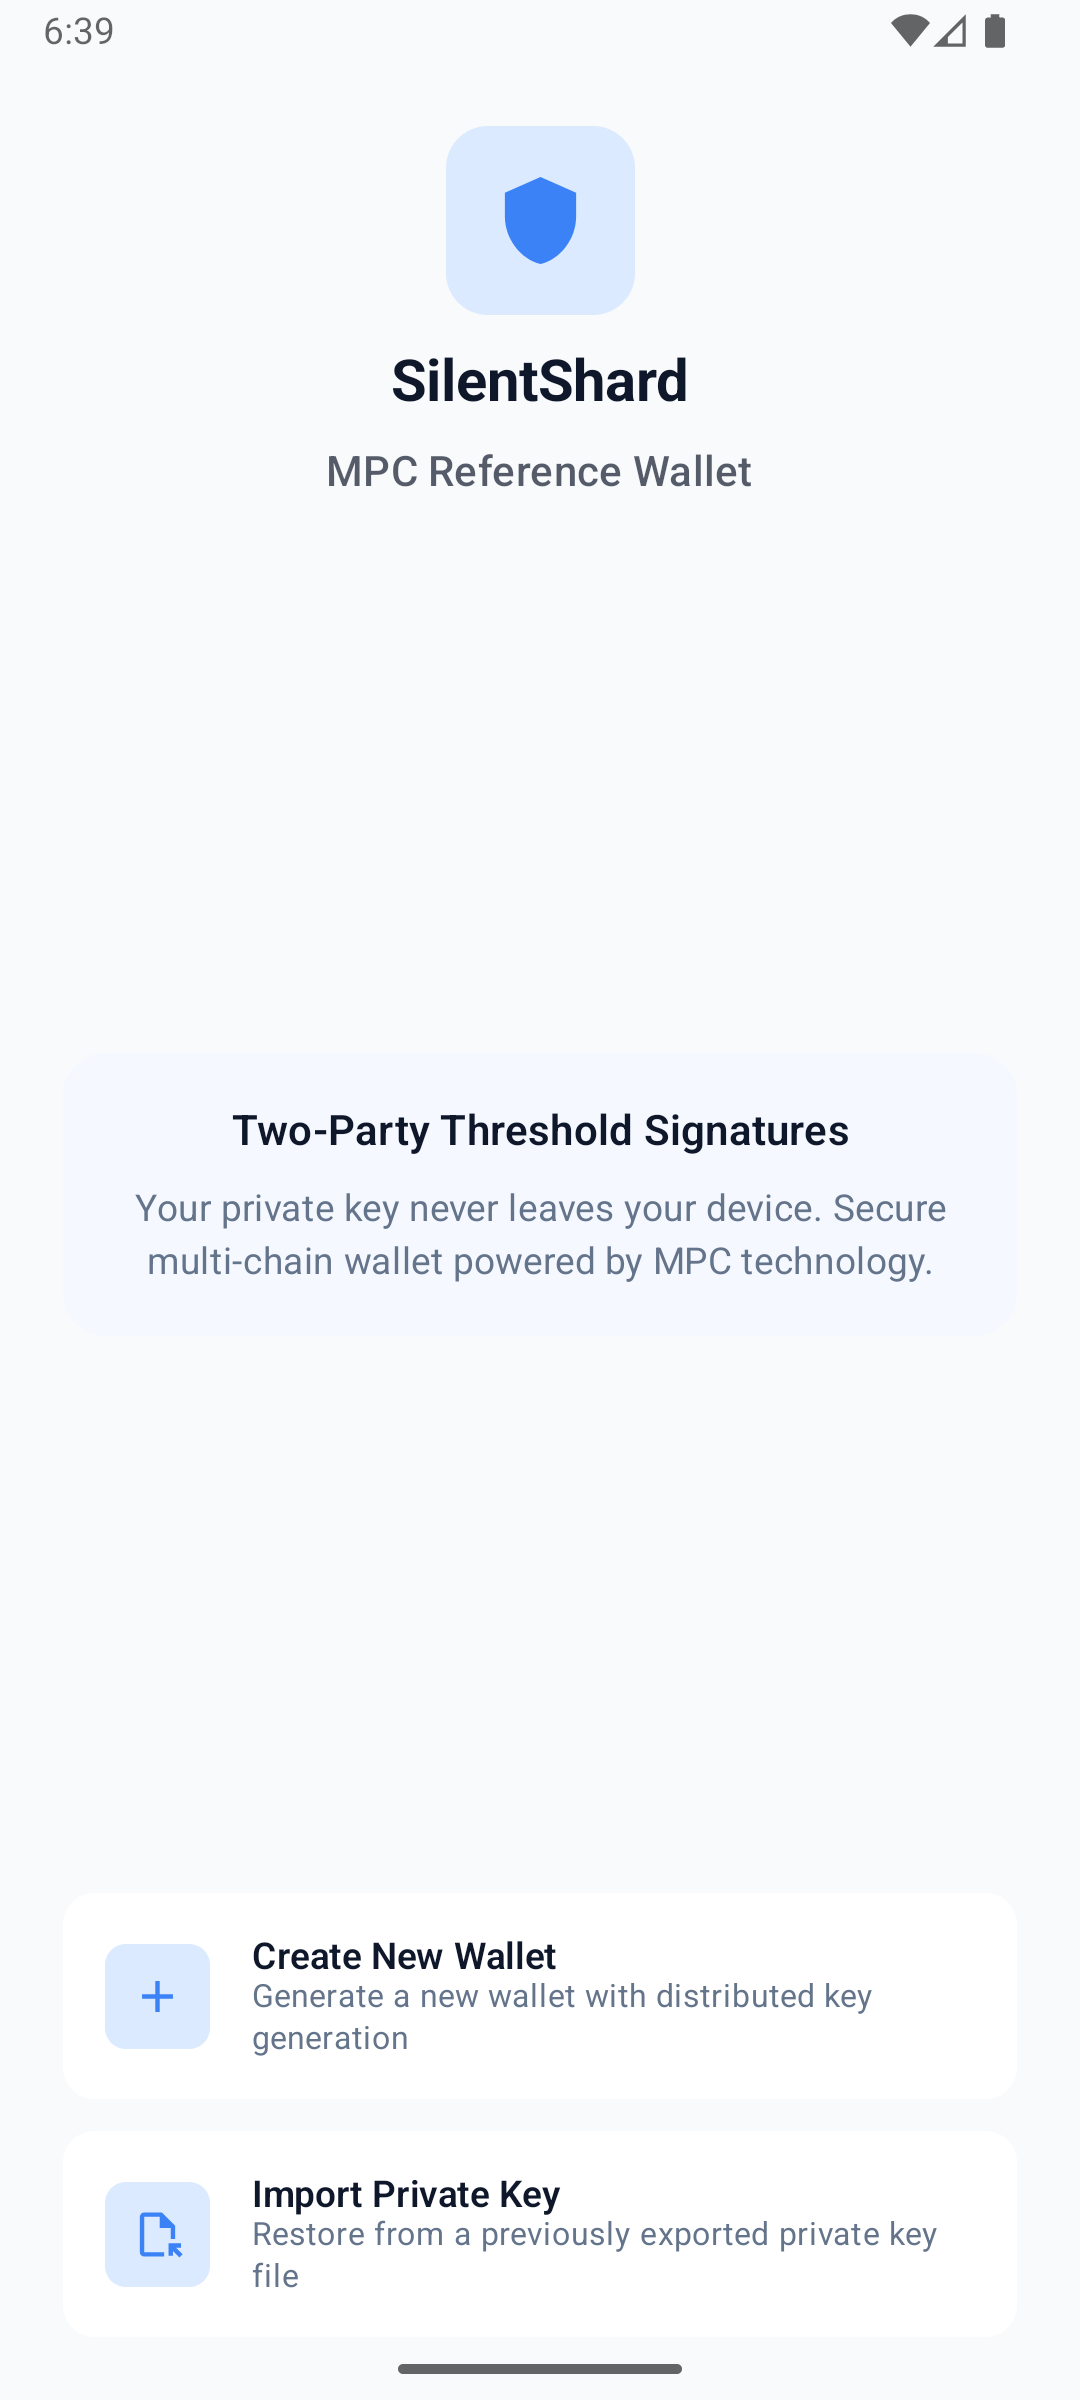
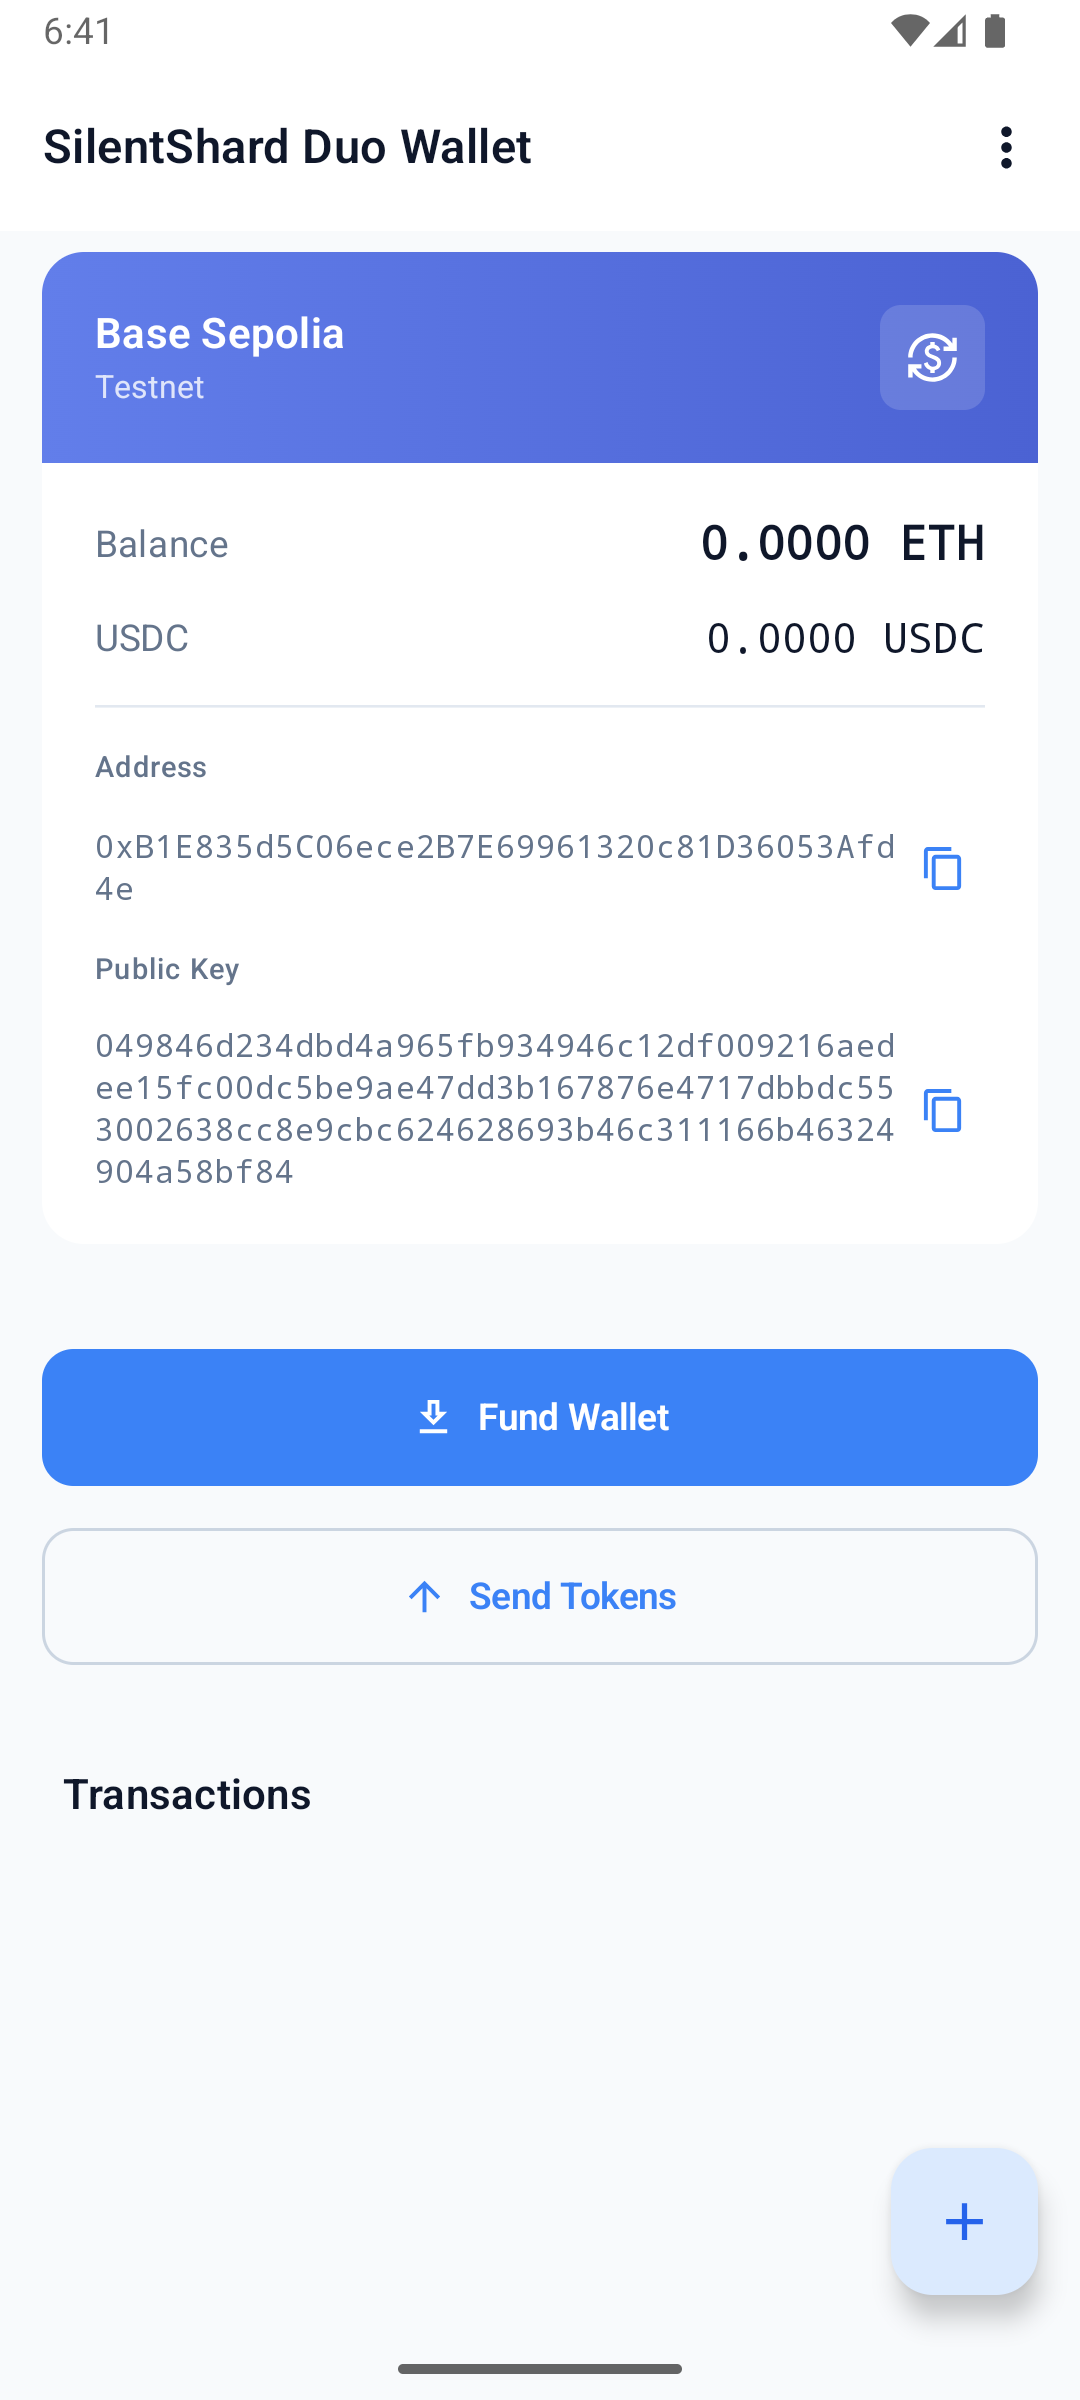
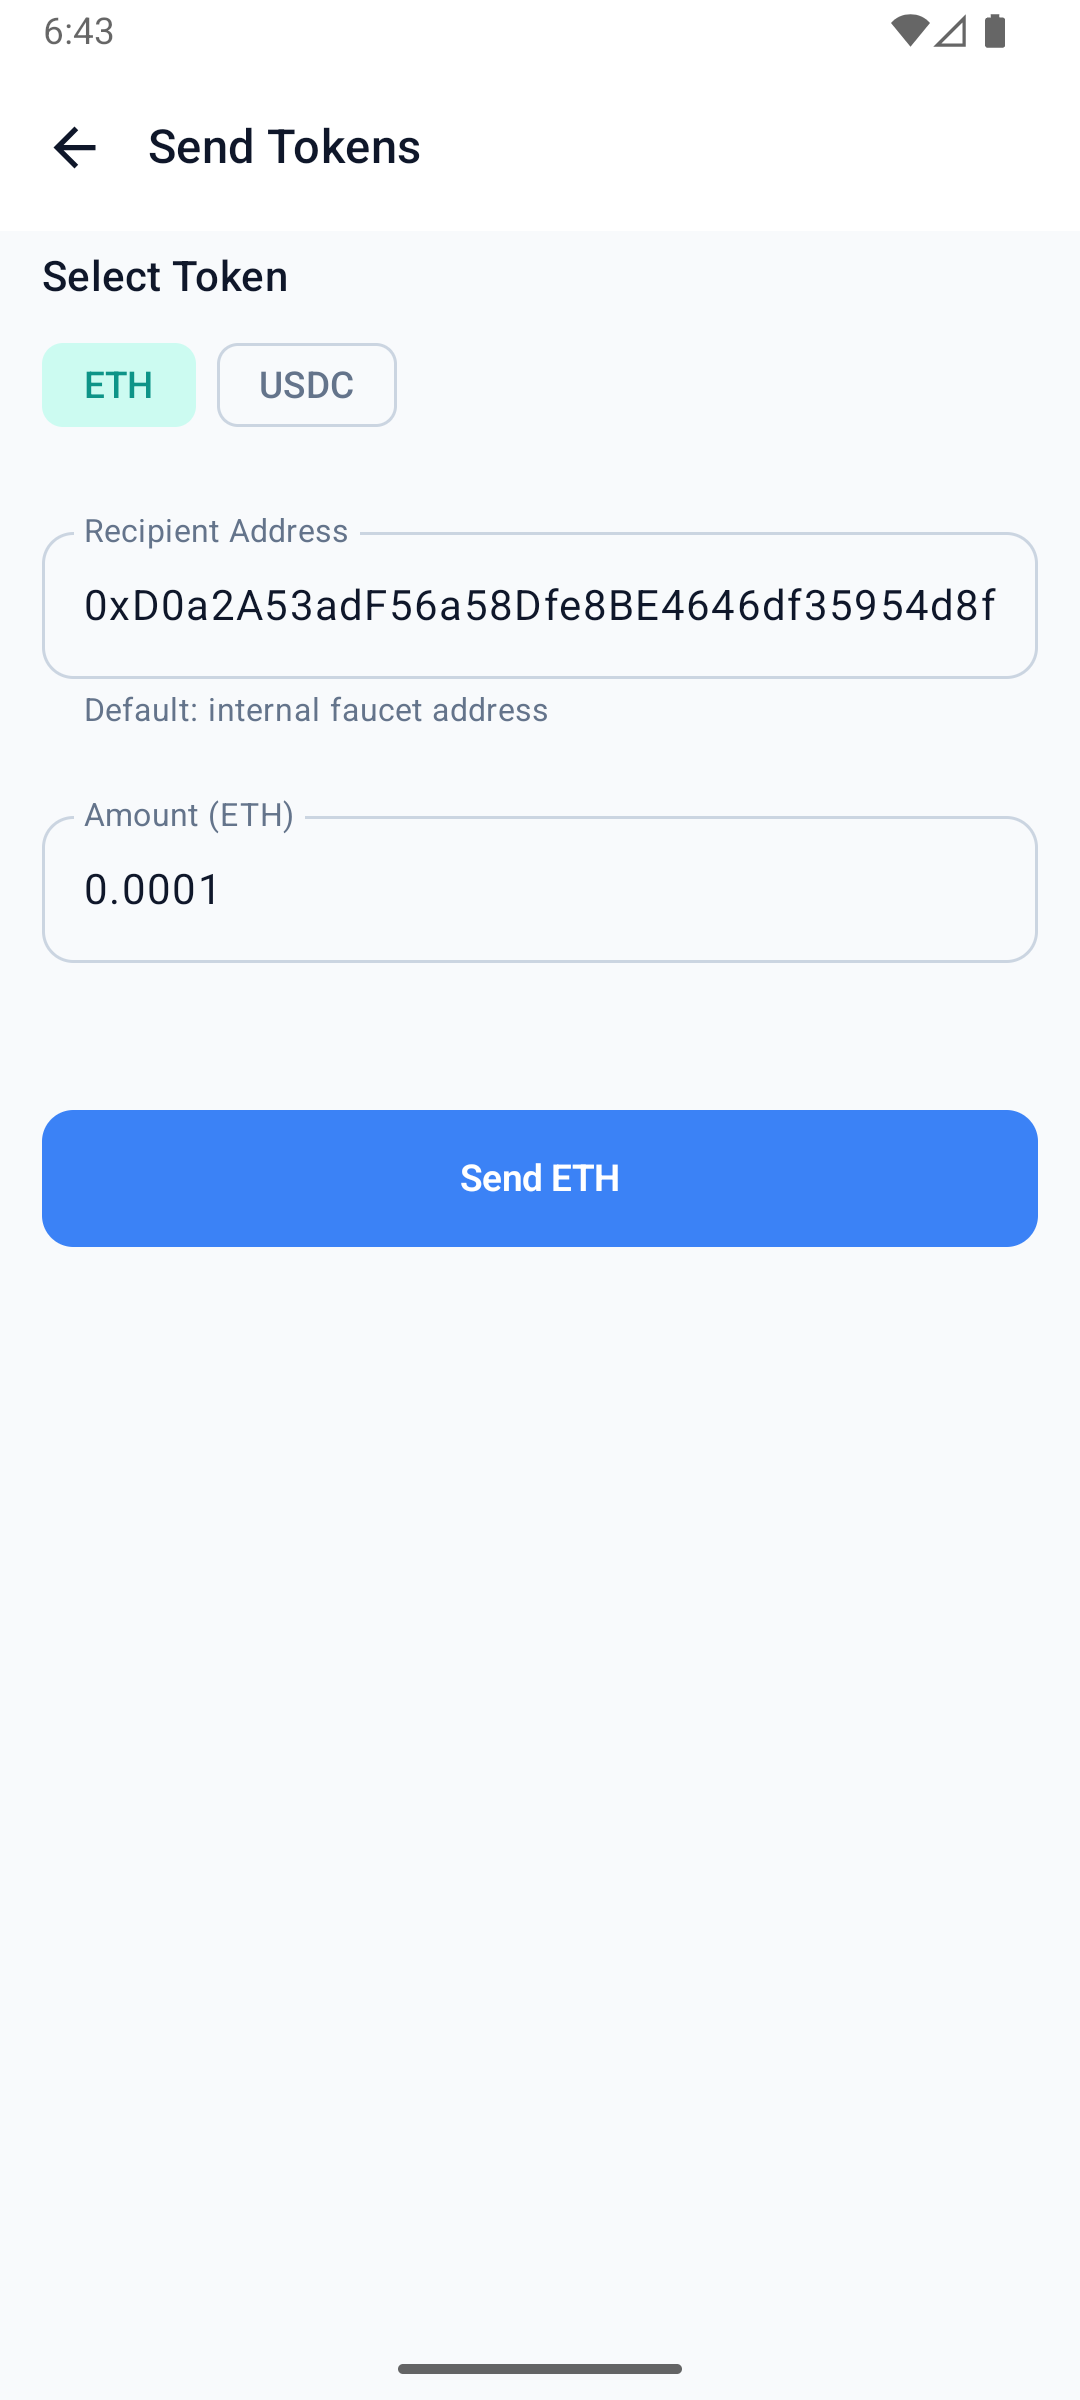
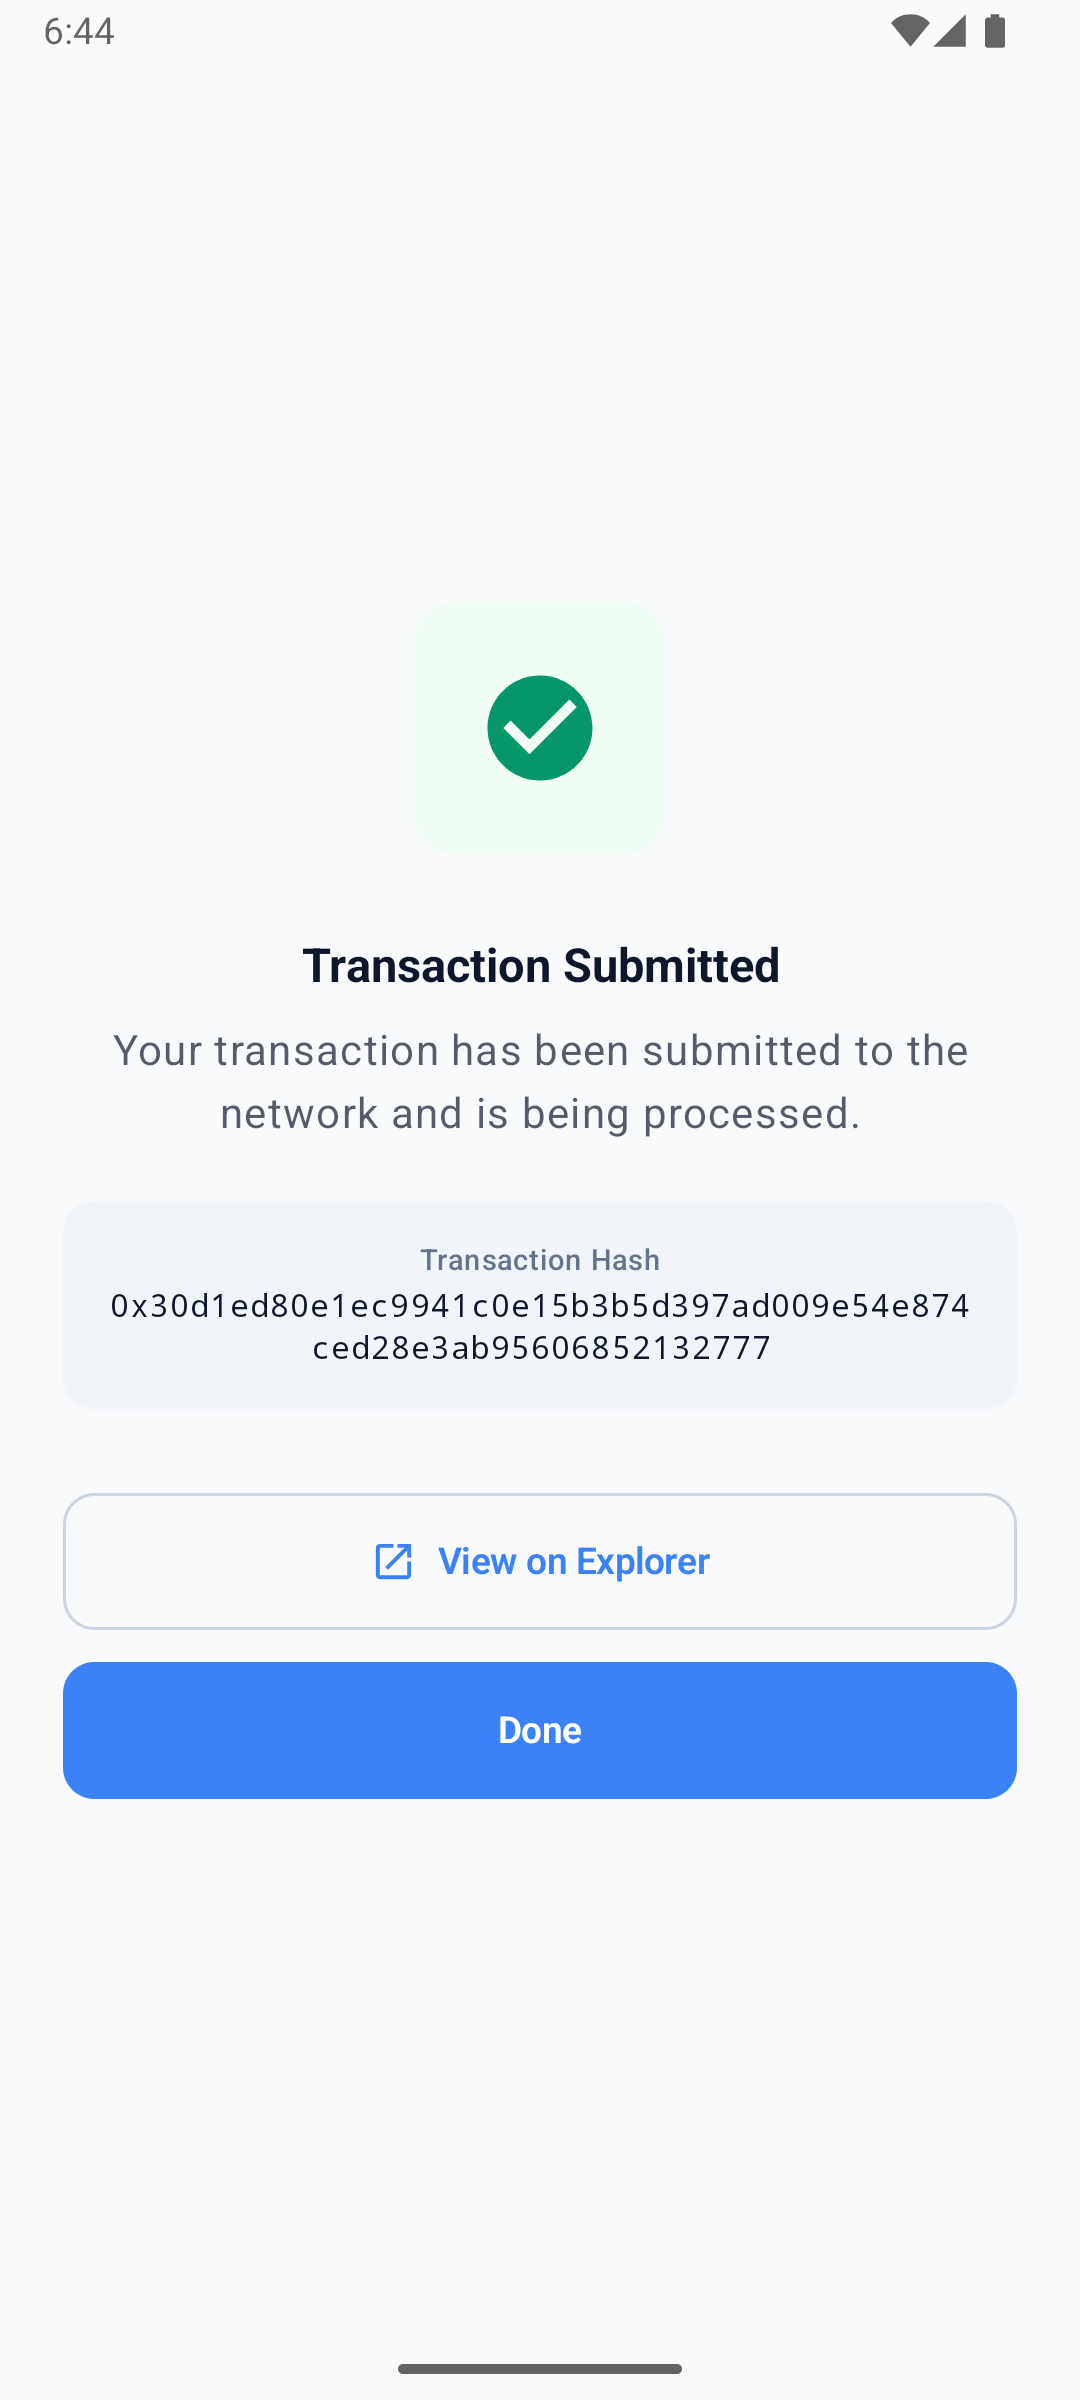
The example-hub reference wallet is a complete Android app that creates a 2-of-2 MPC wallet and signs real Ethereum (Base Sepolia) and Solana (Devnet) transactions. This guide walks through its core MPC code — session setup, keygen, and signing. Clone the app to run the whole thing: wallet UI, funding, and on-chain transactions.
Prerequisites
- Android Studio with a recent Android SDK and JDK.
- Access to the Silence Laboratories Android SDK repository (credentials from our team). Don't have access? Email [email protected].
- A running Android emulator (Android Studio) or a physical device to launch the app on.
Use the hosted demo server for testing. No deployment is required.
- Cloud Node Endpoint:
demo-server.silencelaboratories.com - Cloud Verifying Key:
01cfa1ff5424d14eb60614d7ddf65a32243d26ddf7000d10007853d7336395efe4
As a shared server, it provides no rate-limit or uptime guarantees, and keyshares stored on it may be purged without notice. Do not use it for production.
Setup the Mobile SDK (Android)
The quickest way to get running is to clone the reference app and launch it:
git clone https://github.com/silence-laboratories/examples-hub.git
cd examples-hub/silent-shard-sdk/with-android/duo-initiator
Add your GitHub Packages credentials to local.properties (see Dependency Installation below for the read-only token), then open the project in Android Studio and run it on a device or emulator. It uses the public demo server by default, so you can create a wallet and sign a transaction immediately. The full file-by-file walkthrough (keygen, signing, export, key refresh, and more) is in Android & iOS reference apps.
Session Creation
A DuoSession is the handle for all MPC operations (keygen, sign, and so on). The reference app builds one session per algorithm inside its VaultSessionManager:
// HardwareMessageSigner is the app's own implementation of the SDK's MessageSigner
// interface, signing with a hardware-backed key (Android Keystore).
private val messageSigner = HardwareMessageSigner()
private val websocketConfig = WebsocketConfig(url = DEMO_SERVER_URL, port = DEMO_SERVER_PORT, isSecure = true)

// EncryptedStorageClient is the app's own implementation of the SDK's StorageClient
// interface. Since that interface carries a keyType, ECDSA and EdDSA keyshares are
// persisted through separate clients — one per algorithm.
private val ecdsaStorage = EncryptedStorageClient(store, KeyType.ECDSA)
private val eddsaStorage = EncryptedStorageClient(store, KeyType.EdDSA)

// One DuoSession per algorithm, each bound to the message signer, the cloud
// verifying key, the websocket config, and its storage client.
private val ecdsaSession: DuoSession =
    SilentShard.ECDSA.duoInitiator(messageSigner, CLOUD_VERIFYING_KEY, websocketConfig, ecdsaStorage)

private val eddsaSession: DuoSession =
    SilentShard.EdDSA.duoInitiator(messageSigner, CLOUD_VERIFYING_KEY, websocketConfig, eddsaStorage)
HardwareMessageSigner and EncryptedStorageClient are not SDK types — they are the reference app's own implementations of the SDK's MessageSigner and StorageClient interfaces (hardware-backed P-256 signing and encrypted keyshare storage). Supply your own implementations, or clone the example-hub app to use these as-is.
Run the MPC operations
After creating the session, you can perform MPC operations.
Key Generation
Generate MPC keyshares with the keygen method. It returns a keyId (a String); the SDK persists the keyshare to your StorageClient and every later operation is addressed by that keyId. Here is how the reference app does it:
suspend fun keygen(keyType: KeyType): KeyResult {
    Log.i(TAG, "Keygen started for type: ${keyType.name}")

    // sessionFor(...) is this app's own helper (not an SDK method) — it returns the DuoSession
    // we created earlier for this algorithm (ECDSA or EdDSA).
    val session: DuoSession = sessionFor(keyType)
    // keygen() is the SDK call: runs the MPC protocol, persists the keyshare to your
    // StorageClient, and returns the keyId that addresses it.
    val keyId = session.keygen().getOrThrow()

    val publicKey = extractPublicKey(keyId)

    Log.i(TAG, "Keygen completed for keyId: $keyId")
    return KeyResult(keyId, publicKey)
}
Signature Generation
Sign a message using the sign method, passing the keyId returned from keygen:
suspend fun sign(keyId: String, message: ByteArray, derivationPath: String): ByteArray {
    val dao = readDao(keyId)

    // sessionFor(...) is this app's own helper (not an SDK method) — it returns the DuoSession
    // we created earlier for this key's algorithm (the stored record's keyType).
    val session: DuoSession = sessionFor(dao.keyType)
    // sign() is the SDK call: it produces the threshold signature for the key addressed by keyId.
    val signature = session
        .sign(keyId, message.toHex(), derivationPath)
        .getOrThrow()

    Log.i(TAG, "Sign completed (${signature.size} bytes, type=${dao.keyType.name})")
    return signature
}
The HardwareMessageSigner, EncryptedStorageClient, and WebSocket client shown are the reference app's implementations — hence for reference only, not a recommendation. Provide your own for production.
Setup your own app
Prefer to wire the SDK into your own app instead of the reference project? Create a new Android Studio project by following the official guide (or use an existing one), then add the SilentShard dependency.
Dependency Installation
Step 1: Create access token for the repository
- Get access to the repository https://github.com/silence-laboratories/silent-shard-artifacts from the Silence Laboratories team.
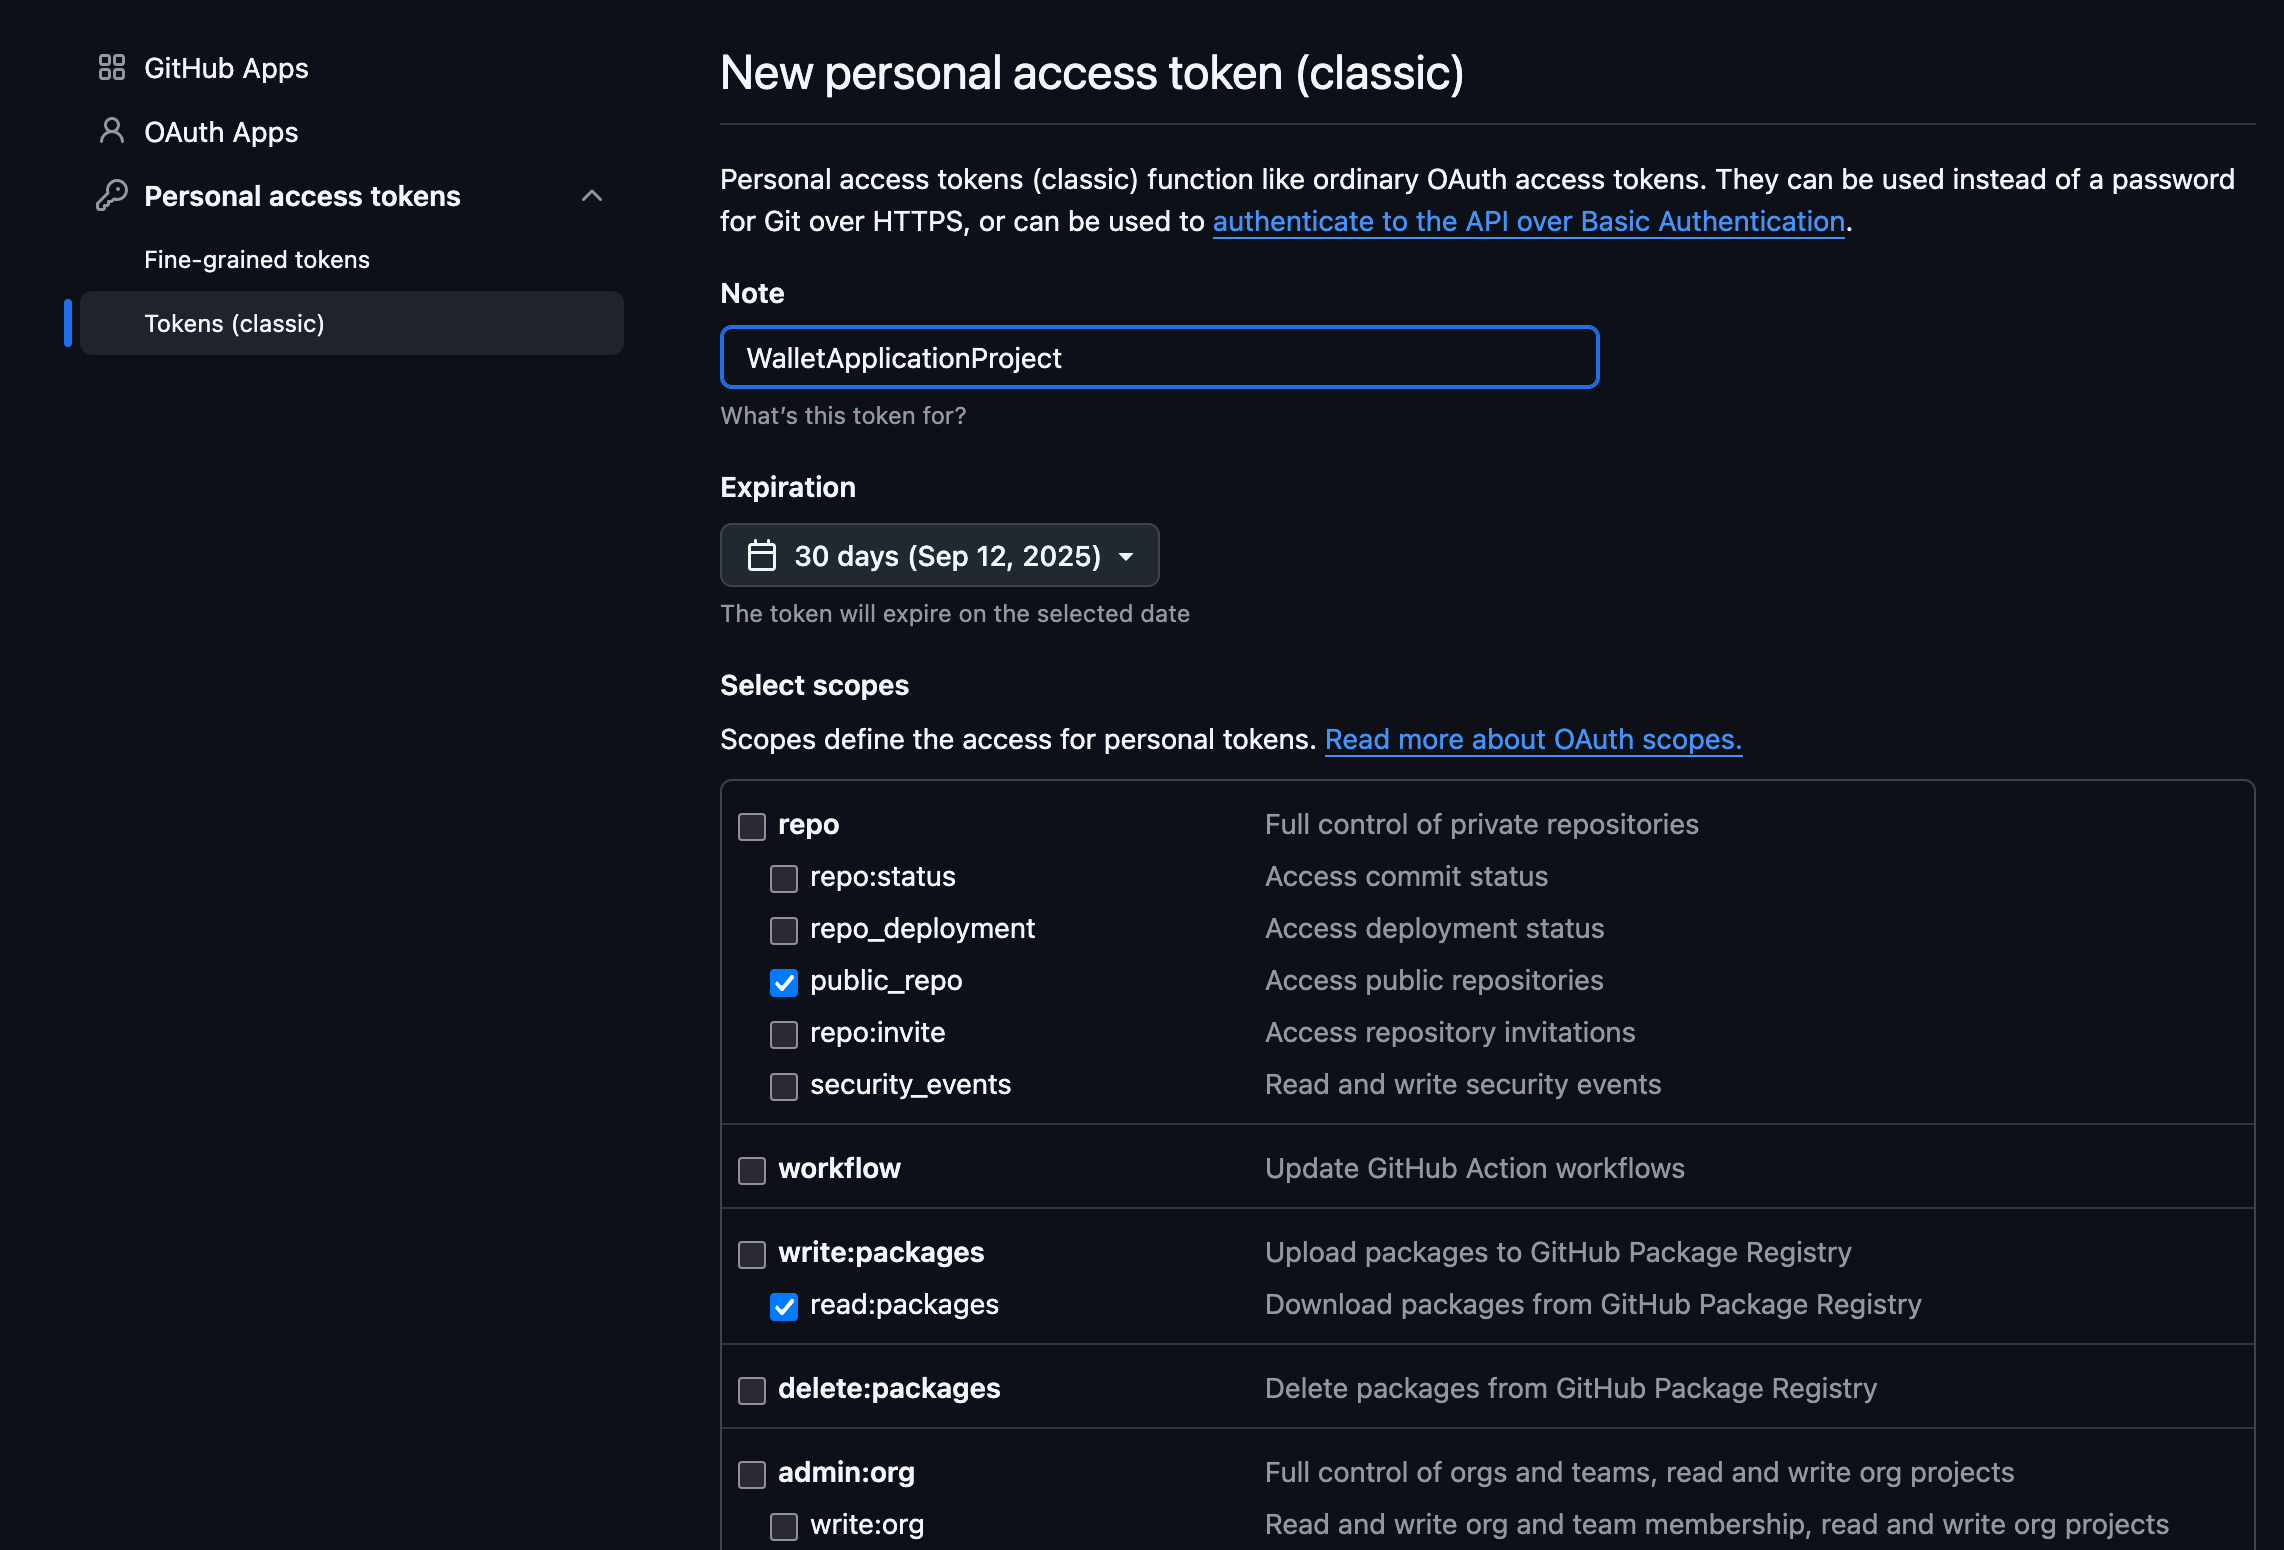
- Create a personal access token at https://github.com/settings/tokens with the following scopes
checked[✓] to access the repository, and it's
associated GithubPackages
through gradle.
- Under
repo-> [✓]public_repo - Under
write:packages-> [✓]read:packages
We can leavewrite:packagesuntouched/unchecked as we only need read access - It will end up looking like this : Two items checked everything else unchecked. See below.
- Under
Step 2: Configure settings.gradle.kts
- Add the silentshard maven repo with the access credentials under the dependencyResolutionManagement -> repositories.
  dependencyResolutionManagement {
  repositoriesMode.set(RepositoriesMode.FAIL_ON_PROJECT_REPOS)
  repositories {
      google()
      mavenCentral()
      maven {
          url =
              uri("https://maven.pkg.github.com/silence-laboratories/silent-shard-artifacts")
          credentials {
              username = "github_username"
              password = "token_we_just_created"
          }
      }
  }
  }
Step 3: Configure app level build.gradle.kts
Add the silentshard dependency in your dependencies block:
dependencies {
  implementation("com.silencelaboratories.silentshard:duo:1.0.0")
}
Step 4: Gradle-Sync
- Sync gradle with project files.
The SDK talks to the Duo Server over the network, so your app needs the internet permission. Add it to your AndroidManifest.xml:
<uses-permission android:name="android.permission.INTERNET" />
With the dependency in place, wire it up the same way the reference app does — create a session, then run keygen and signing.
Optional: Run your own Duo Server
Install Docker
- Linux
- macOS
- Windows
curl -fsSL https://get.docker.com | sh
Download and install Docker Desktop from the official website.
Alternatively, you can install using Homebrew:
brew install --cask docker
Download and install Docker Desktop from the official website.
Make sure to enable WSL 2 backend during installation for better performance.
Install OpenSSL
- Linux
- macOS
- Windows
# Ubuntu/Debian
sudo apt-get update && sudo apt-get install openssl
OpenSSL is usually pre-installed on macOS. To install or update using Homebrew:
brew install openssl
Download and install from the official OpenSSL website.
Alternatively, you can install using Chocolatey:
choco install openssl
Or using Windows Package Manager:
winget install OpenSSL.OpenSSL
Login to Docker
- Login to docker using Personal Access Token(PAT) and your username.
Guide to generate GitHub Personal Access Token
- Go to GitHub Personal Access Tokens
- Click on "Generate new token", we are using the classic token for this guide.
- Enter a name for the token
- Select the "read::packages Download packages from GitHub Package Registry" scope.
- Generate the token.
Learn more about GitHub Personal Access Tokens here.
echo <PAT> | docker login ghcr.io -u <username> --password-stdin
Start the Server
For local setup, let's use this example docker-compose.yml
services:
  duo-server:
    image: ghcr.io/silence-laboratories/dkls23-rs/duo-server:v4
    command: /usr/local/bin/sigpair-node
    environment:
      RUST_LOG: info
      LISTEN: 0.0.0.0:8080
      DEV_MASTER_SIGN_KEY: /run/secrets/duo-signing-master-key
      FILE_STORAGE_URL: file:///data/
    ports:
      - 8080:8080
    volumes:
      - duo-server-data:/data
    secrets:
      - duo-signing-master-key

volumes:
  duo-server-data:

secrets:
  duo-signing-master-key:
    file: ${MESSAGE_SIGNING_KEY:-./party_0_sk}
The docker compose file is configured to use the party_0_sk file in the root of the project. party_0_sk is the random bytes used as seed to create the server private key.
Create the party_0_sk file with random bytes in the root of the project.
openssl rand 32 > party_0_sk
Now let's start the server by running
docker compose up
If everything was setup correctly, the server should be running with these logs
Attaching to duo-server-1
duo-server-1  | WARN: The dotenv file is not set
duo-server-1  | 2025-09-16T09:59:09.200234Z  INFO sigpair_node: Creating SimpleStorage
duo-server-1  | 2025-09-16T09:59:09.201975Z  INFO sigpair_node: Party VK <YOUR_CLOUD_VERIFYING_KEY_HEX_STRING>
duo-server-1  | 2025-09-16T09:59:09.202413Z  INFO sigpair_node: listening on 0.0.0.0:8080
Great! The server is now setup to perform MPC actions with our mobile.
In logs you will notice a hex string of length 66 (33 bytes). This is the YOUR_CLOUD_VERIFYING_KEY_HEX_STRING which will be used by server to verify the requests from other party (In this case, our mobile app).
The SDK's cloudVerifyingKey expects the 32-byte (64 hex char) Ed25519 key. If the server logs a 33-byte Party VK, drop the leading 01 byte and use the remaining 32 bytes.
The YOUR_CLOUD_NODE_ENDPOINT is the endpoint of the server. In this case, it is 0.0.0.0:8080 for ios and 10.0.2.2:8080 for android. Also you can use the IP address of your machine if you are running the server on your machine.
Set up the Mobile SDK and run your first MPC operations.
You will create a working MPC two-party setup, where the first party, an iOS application interacts with Duo Server as a second party. We are providing a demo server endpoint for your convenience.
What you'll build
The example-hub reference wallet is a complete iOS app that creates a 2-of-2 MPC wallet and signs real Ethereum (Base Sepolia) and Solana (Devnet) transactions. This guide walks through its core MPC code — session setup, keygen, and signing. Clone the app to run the whole thing: wallet UI, funding, and on-chain transactions.
Prerequisites
- Xcode (a recent version) with Swift.
- Access to the Silence Laboratories iOS SDK (Swift package, credentials from our team). Don't have access? Email [email protected].
- A running iOS Simulator (Xcode) or a physical device to launch the app on.
Use the hosted demo server for testing. No deployment is required.
- Cloud Node Endpoint:
demo-server.silencelaboratories.com - Cloud Verifying Key:
01cfa1ff5424d14eb60614d7ddf65a32243d26ddf7000d10007853d7336395efe4
As a shared server, it provides no rate-limit or uptime guarantees, and keyshares stored on it may be purged without notice. Do not use it for production.
Setup the Mobile SDK (iOS)
The quickest way to get running is to clone the reference app and launch it:
git clone https://github.com/silence-laboratories/examples-hub.git
cd examples-hub/silent-shard-sdk/with-ios/duo-initiator
Authenticate the private SPM package by adding your GitHub account in Xcode → Settings → Accounts (see Dependency Installation below for details), then open SilentShardWalletDuo.xcodeproj in Xcode, let Swift Package Manager resolve the dependencies, and run it on a device or simulator. It uses the public demo server by default, so you can create a wallet and sign a transaction immediately. The full file-by-file walkthrough (keygen, signing, export, key refresh, and more) is in Android & iOS reference apps.
Session Creation
A DuoSession is the handle for all MPC operations (keygen, sign, and so on). The reference app builds one session per algorithm inside its VaultSessionManager:
init() {
    let fileStorage = EncryptedFileStorage()
    let signer: MessageSigner
    do {
        // SecureEnclaveMessageSigner is the app's own implementation of the SDK's MessageSigner
        // interface, signing with a hardware-backed key (Secure Enclave).
        signer = try SecureEnclaveMessageSigner()
    } catch {
        fatalError("Failed to initialize Secure Enclave: \(error). Use a physical device.")
    }
    self.messageSigner = signer
    self.store = fileStorage
    // EncryptedStorageClient is the app's own implementation of the SDK's StorageClient
    // interface, one per algorithm (ECDSA / EdDSA).
    self.ecdsaStorage = EncryptedStorageClient(store: fileStorage, algorithm: .ecdsa)
    self.eddsaStorage = EncryptedStorageClient(store: fileStorage, algorithm: .eddsa)
}

private func createWebsocketConfig() -> WebsocketConfig {
    WebsocketConfig(url: Self.demoServerUrl, port: 443, isSecure: true)
}

// One DuoSession per algorithm, each bound to the message signer, the cloud
// verifying key, the websocket config, and its storage client.
private func getEcdsaSession() -> DuoSession {
    if let session = ecdsaSession { return session }
    let session = SilentShard.ECDSA.duoInitiator(
        messageSigner: messageSigner,
        cloudVerifyingKey: Self.cloudVerifyingKey,
        websocketConfig: createWebsocketConfig(),
        storageClient: ecdsaStorage
    )
    ecdsaSession = session
    return session
}

private func getEddsaSession() -> DuoSession {
    if let session = eddsaSession { return session }
    let session = SilentShard.EdDSA.duoInitiator(
        messageSigner: messageSigner,
        cloudVerifyingKey: Self.cloudVerifyingKey,
        websocketConfig: createWebsocketConfig(),
        storageClient: eddsaStorage
    )
    eddsaSession = session
    return session
}
SecureEnclaveMessageSigner and EncryptedStorageClient are not SDK types — they are the reference app's own implementations of the SDK's MessageSigner and StorageClient interfaces (Secure Enclave-backed P-256 signing and encrypted keyshare storage). Supply your own implementations, or clone the example-hub app to use these as-is.
Run the MPC operations
After creating the session, you can perform MPC operations.
Key Generation
Generate MPC keyshares with the keygen method. It returns a keyId (a String); the SDK persists the keyshare to your StorageClient and every later operation is addressed by that keyId. Here is how the reference app does it:
func keygen(type: KeyType) async throws -> KeygenResult {
    log.info("Keygen started: \(type.rawValue)")
    // sessionForKeyType(...) is this app's own helper (not an SDK method) — it returns the DuoSession
    // we created earlier for this algorithm (ECDSA or EdDSA).
    let session: DuoSession = sessionForKeyType(type)
    // keygen() is the SDK call: runs the MPC protocol, persists the keyshare to your
    // StorageClient, and returns the keyId that addresses it.
    let keyId = try await session.keygen().get()
    let publicKey = try await extractPublicKey(keyId: keyId)
    log.info("Keygen completed: keyId=\(keyId), pubKey=\(publicKey.count) bytes")
    return KeygenResult(keyId: keyId, publicKey: publicKey)
}
Signature Generation
Sign a message using the sign method, passing the keyId returned from keygen:
func sign(keyId: String, message: Data, derivationPath: String) async throws -> Data {
    log.info("Sign started: keyId=\(keyId), msg=\(message.count) bytes")
    let record = try loadRecord(keyId: keyId)
    let messageHex = message.map { String(format: "%02x", $0) }.joined()
    // sessionForKeyType(...) is this app's own helper (not an SDK method) — it returns the DuoSession
    // we created earlier for this key's algorithm (the stored record's keyType).
    let session: DuoSession = sessionForKeyType(record.keyType)
    // sign() is the SDK call: it produces the threshold signature for the key addressed by keyId.
    let sig = try await session.sign(keyId: keyId, message: messageHex, derivationPath: derivationPath).get()
    log.info("Sign completed: \(sig.count) bytes")
    return sig
}
The SecureEnclaveMessageSigner, EncryptedStorageClient, and WebSocket client shown are the reference app's implementations — hence for reference only, not a recommendation. Provide your own for production.
Setup your own app
Prefer to wire the SDK into your own app instead of the reference project? Create a new Xcode project by following the official guide (or use an existing one), then add the SilentShard dependency.
Dependency Installation
Step 1: Create Package URL
- Get access to the repository https://github.com/silence-laboratories/silent-shard-artifacts from the Silence Laboratories team.
- Get the package URL
- Add GitHub account : Skip this step if you already have added your GitHub account in Xcode. You can add your GitHub account by following the steps ( only until it adds your GitHub account).
- Final package URL: https://github.com/silence-laboratories/silent-shard-artifacts.
Step 2: Open Package(SPM) Collection Window
- In Xcode, open the Project Navigator.
- Select the project file (the root item in the navigator).
- In the Project Editor, select your project(Your Xcode Project title under
Projectsection). - Navigate to the Package Dependencies tab. See below

- Click the + icon (hint :Add Package Dependency) at the bottom of the Package Dependencies section.
- A dialog box will appear prompting you to enter a package URL.
Step 3: Add Package
- Copy the package URL (We get this from Step 2).
- Paste this URL into the
Search or Enter Package URLbox.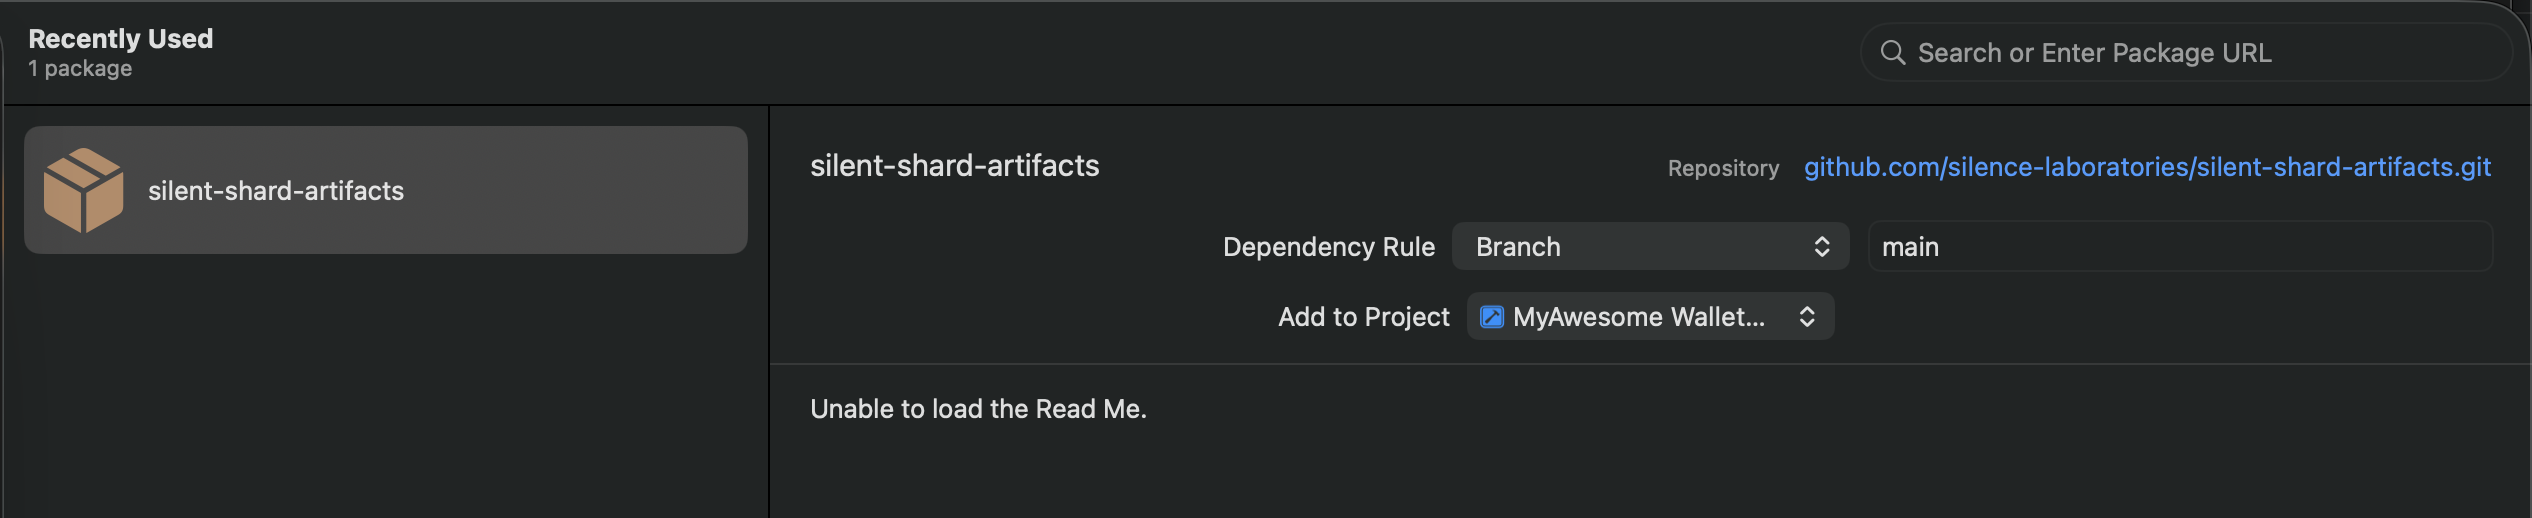
- Select the
silentshard-artifactson the left panel. - Click Add Package to proceed.
Step 4: Confirm and Add Package
- Xcode will fetch the package details.
- Add library
duoto your targets By clicking dropdown from the " Add to Target" items.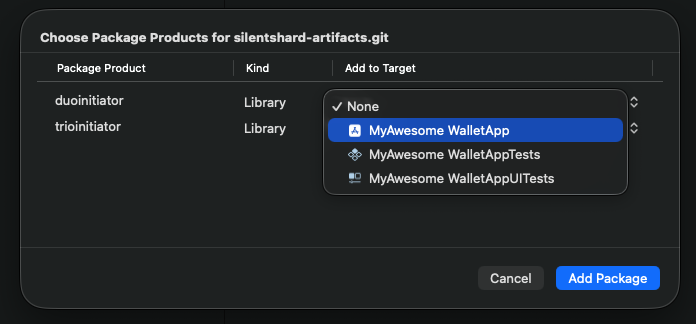
- Click Add Package to complete the installation.
With the SDK package added, wire it up the same way the reference app does — create a session, then run keygen and signing.
Optional: Run your own Duo Server
Install Docker
- Linux
- macOS
- Windows
curl -fsSL https://get.docker.com | sh
Download and install Docker Desktop from the official website.
Alternatively, you can install using Homebrew:
brew install --cask docker
Download and install Docker Desktop from the official website.
Make sure to enable WSL 2 backend during installation for better performance.
Install OpenSSL
- Linux
- macOS
- Windows
# Ubuntu/Debian
sudo apt-get update && sudo apt-get install openssl
OpenSSL is usually pre-installed on macOS. To install or update using Homebrew:
brew install openssl
Download and install from the official OpenSSL website.
Alternatively, you can install using Chocolatey:
choco install openssl
Or using Windows Package Manager:
winget install OpenSSL.OpenSSL
Generate GitHub Personal Access Token
Get a Personal Access Token from GitHub if you don't have one.
Guide to generate GitHub Personal Access Token
- Go to GitHub Personal Access Tokens
- Click on "Generate new token", we are using the classic token for this guide.
- Enter a name for the token
- Select the "read::packages Download packages from GitHub Package Registry" scope.
- Generate the token.
Login to Docker Registry
Login to docker using Personal Access Token and your GitHub username.
echo <PAT> | docker login ghcr.io -u <username> --password-stdin
Start the Server
For local setup, let's use this example docker-compose.yml
services:
  duo-server:
    image: ghcr.io/silence-laboratories/dkls23-rs/duo-server:v4
    command: /usr/local/bin/sigpair-node
    environment:
      RUST_LOG: info
      LISTEN: 0.0.0.0:8080
      DEV_MASTER_SIGN_KEY: /run/secrets/duo-signing-master-key
      FILE_STORAGE_URL: file:///data/
    ports:
      - 8080:8080
    volumes:
      - duo-server-data:/data
    secrets:
      - duo-signing-master-key

volumes:
  duo-server-data:

secrets:
  duo-signing-master-key:
    file: ${MESSAGE_SIGNING_KEY:-./party_0_sk}
The docker compose file is configured to use the party_0_sk file in the root of the project. party_0_sk is the random bytes used as seed to create the server private key.
Create the party_0_sk file with random bytes in the root of the project.
openssl rand 32 > party_0_sk
Now let's start the server by running
docker compose up
If everything was setup correctly, the server should be running with these logs
Attaching to duo-server-1
duo-server-1  | WARN: The dotenv file is not set
duo-server-1  | 2025-09-16T09:59:09.200234Z  INFO sigpair_node: Creating SimpleStorage
duo-server-1  | 2025-09-16T09:59:09.201975Z  INFO sigpair_node: Party VK <YOUR_CLOUD_VERIFYING_KEY_HEX_STRING>
duo-server-1  | 2025-09-16T09:59:09.202413Z  INFO sigpair_node: listening on 0.0.0.0:8080
Great! The server is now setup to perform MPC actions with our mobile.
In logs you will notice a hex string of length 66 (33 bytes) logged as the Party VK. This is the YOUR_CLOUD_VERIFYING_KEY_HEX_STRING the server uses to verify requests from the other party (in this case, our mobile app). The SDK expects the 32-byte key, so drop the leading 01 byte and use the remaining 32 bytes as the cloudVerifyingKey.
The YOUR_CLOUD_NODE_ENDPOINT is the endpoint of the server. To reach a server running on your machine from the iOS simulator or a physical device, use your machine's LAN IP address (e.g. 192.168.1.100:8080). Note: 10.0.2.2 only works on the Android emulator, not on iOS.
The isSecure flag on WebsocketConfig indicates whether the connection is WSS (secure) or WS. Use true for a secure connection; use false for a local server. For a local dev server, pass the bare host/IP with port and isSecure: false, e.g. WebsocketConfig(url: "192.168.1.100", port: 8080, isSecure: false).